Last summer I was sooo lucky, after selling off some unused tools, to take the plunge and buy my hydraulic press. I researched and researched...Will it be the Shark Bite? The Bonny Doone? Then I stumbled onto the Potter USA website. I first I dismissed it, was it for ceramics(potters?)? I went around and asked others questions..read up on building my own. I do tend to obsess over the details when I am making a big decisions like this one. Then with more searching I found the Potter USA site again and this lead to Kevin Potter's You Tube channel. The videos of this guy totally enjoying his job..cutting and welding metal won me over. I then ask him a bazzillion questions which he patiently answered. So my order was placed...once it arrived...It was Love at first site! Or should I say first squeeze! I thought of making a video showing you how they work. But how much better could it be to see Kevin himself explaining how a blanking die (or pancake die) works with a 20-ton press. The press can do a multitude of tasks. Cutting metals blanks is just one of them. Thus the term "blanking die". This is a sample of what a pancake die looks like:Here is Kevin demonstrating how to cut with the die:
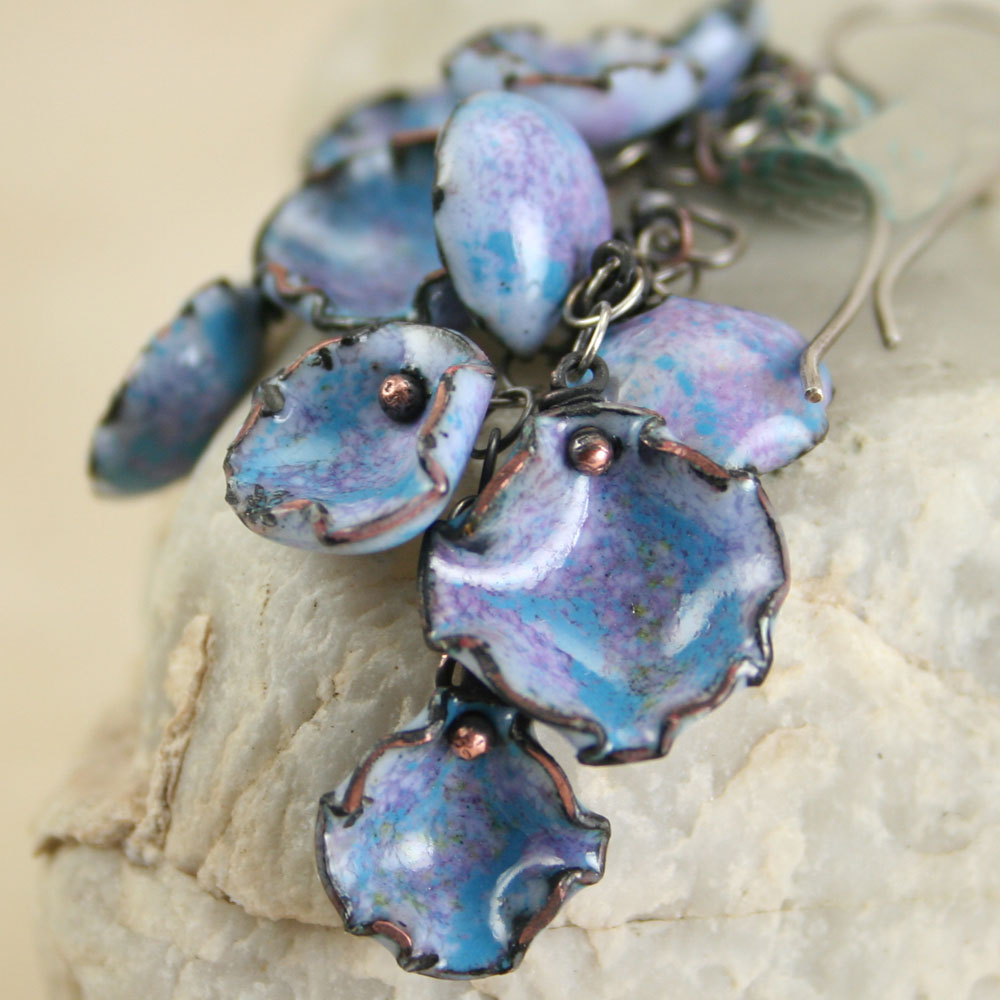
This is a necklace I made using this very die. I first cut it out of copper, shaped it with some reposse and dapping tools. Then I enameled it:
More about the press later.
Michelle Mahler Teka and Zoe and Fundametals.net
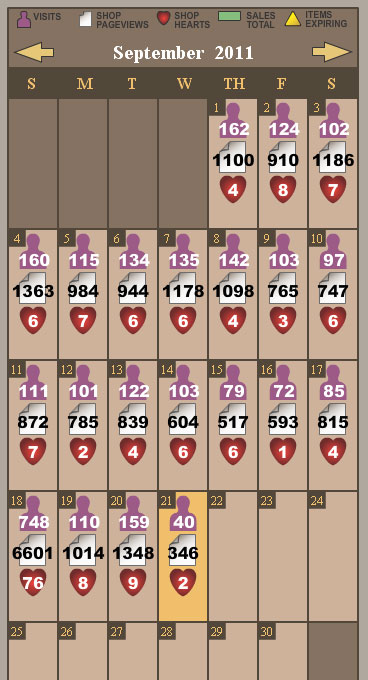
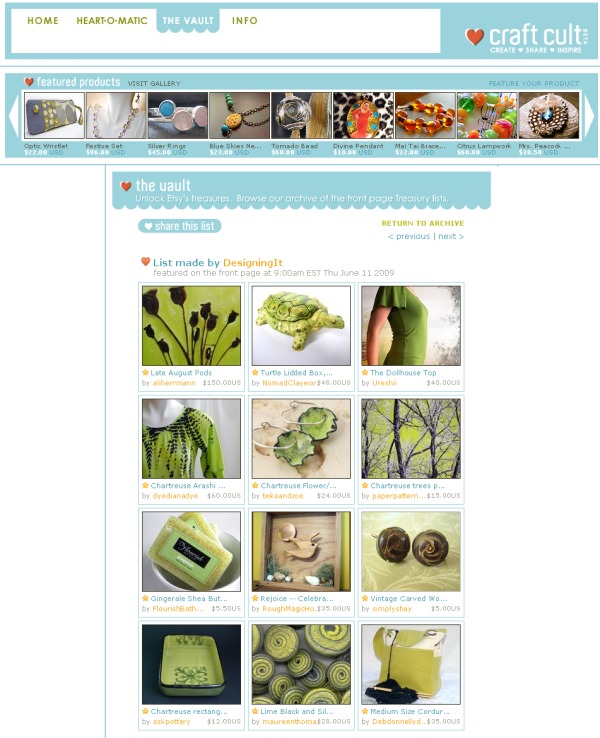
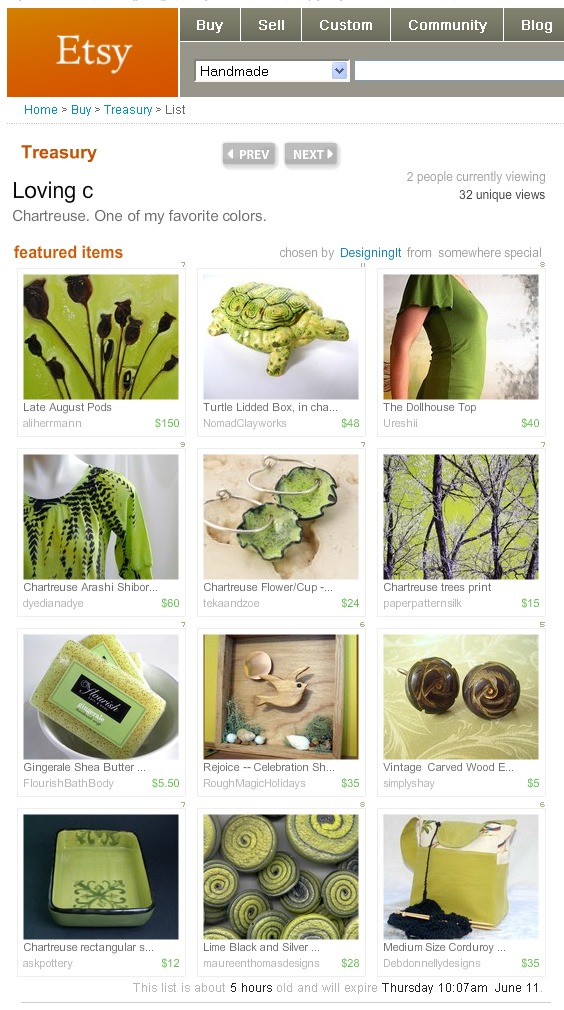
From my previous post you see that I made it into a treasury that made it in the Front Page. That tiny little window in time is so important. There are so many items on Etsy it is very hard to be found. And to make matters worse Etsy changed the search method from a recency search to a relevancy search. I think for some items it is a good thing as you will get better results. But for us jewelry makers it is even harder to be found. You can imagine even if you have your titles right and all your key words right that is 5000 people are doing the same thing that it is the luck of the draw who is going to make it on say the first 10 pages of the search. Some customers may not even look down 10 pages. That being said I wanted to show you the power of a front page showing. The picture below is a screen shot of my shop on the Shop Lovers online tools on Craftopolis.com. The little purple man is the visits per that day in my shop, the white page is the page views in my shop ad the red heart is the hearts that day. I got the front page on Sept 18th. You can see the spike. The previous Sunday 873 page views...the day of the mention 6601. WOW! This is a big spike. Everything went up. Can you imagine my luck and wonder if it happened every day?? I would probably cry as I could not keep up. I have had a little spike in orders this week. But you never know what the hearts will lead to later.
p.s. not matter what i try i cannot get my picture to center. If you have any tips e-mail me.
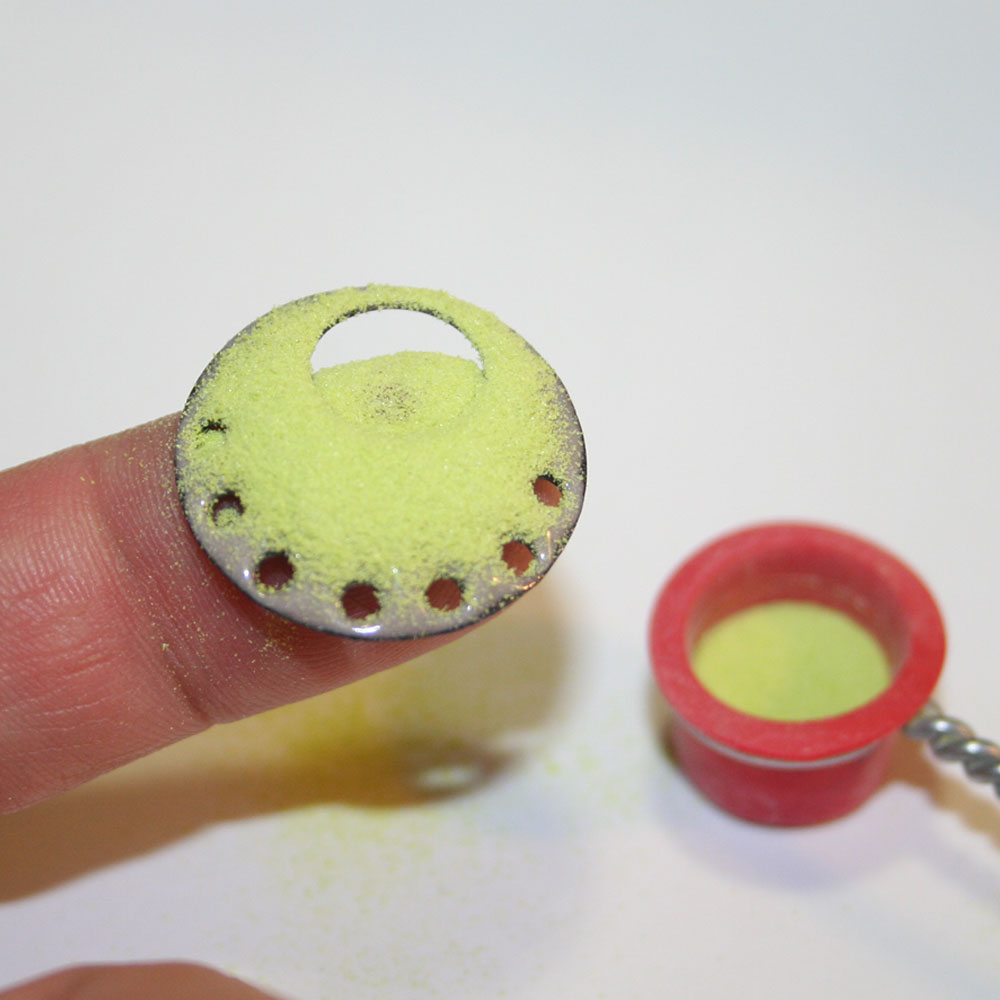
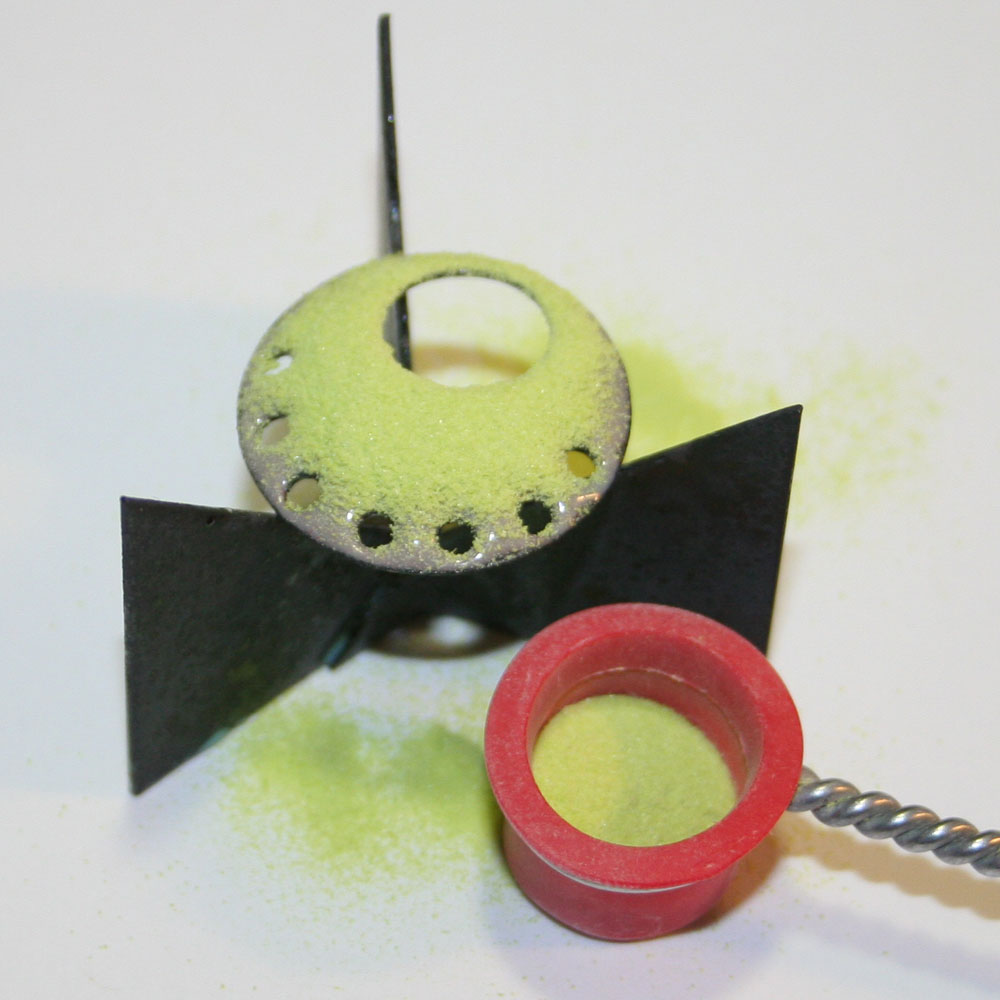
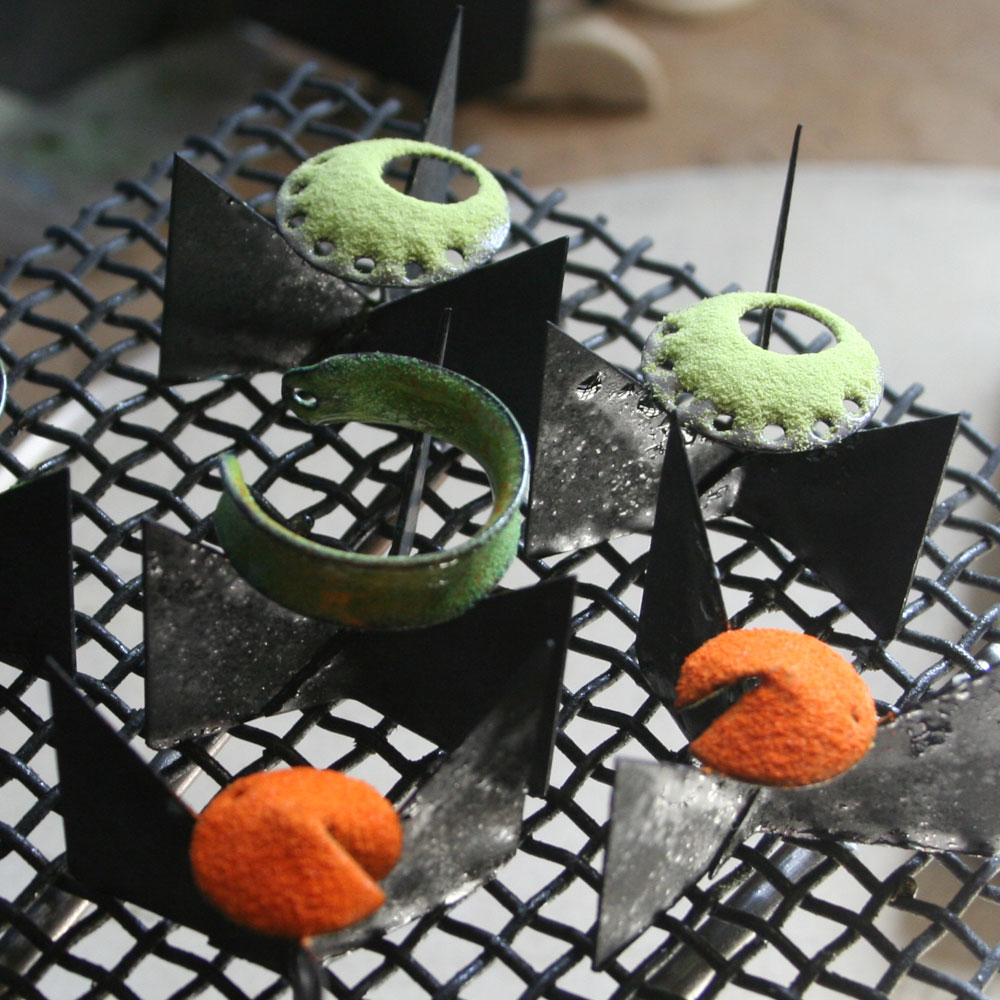
It has been to long between posts. I have been crazy busy with x-mas sales. I think I see the light at the end of the tunnel. In between my orders I have been experimenting with new techniques. I have been wanting to try stenciling for while. Finally got the correct sifter and dabbled a bit. More to come as time permits. I like it and want to experiment more. Here are the results:
I decided to take a few moments to try to get some "process" pics of my enameling. The first picture is the enamel power first sifted onto a piece of copper that is going to be an earring: On the Kiln Support ready to go in the Kiln: Several pairs of earrings are loaded on the kiln rack ready to go for firing. This is a rack of earrings that I just took out of the kiln. So they are around 1400 degrees. The colors are still kind of ugly as they develop when they cool. This picture is of the same earrings but cooled down so that the colors are coming to life. Yummy!!
I have dabbled here and there with dyeing. Never really been that good at it. Or had the patience or the space to get "messed up". That is until I discovered Colorhue dyes. They are an instant set silk dye that does not need heat setting. You can actually dye small thing in a teacup. In the doll worlds it used to be called Dyeing in a Teacup. I have been busy today doing things I have been putting off for over a year. Hubby took kids fishing for a few hours so I started dyeing. Dyeing and kids generally don't mix!! So I always seem put it off. It started when I bought this silk fabric with these great little teeny weenie diamonds woven in. When I got it the color was awful..I thought I was getting eggshell and it was a dull gray beige. REALLY dull and yucky. So I cut of a few yards of it, tossed it in the kitchen sink for dyeing. I had nothing to loose as I already lost out by buying it. I used the Colorhue dyes to dye up a batch in pink. Because Colorhue dyes are transparent they did not completely cover the gray/beige. So I got this wonderful rose color. After such great results I called up and ordered 10 more yards of that awful fabric. That 10 yards has been sitting on my table for year WAITING for time and inspiration to dye more. I figured since I was alone for a few hours and it is a HOLIDAY I could "waste" a bit of time doing something I never have time for. I am THRILLED. The colors I got are fabulous. I got a sage green, an amethyst and a powder dusty blue along with the dusty rose. They are so vintage-y. Just like you got them out of Grandmas trunk. So I was further inspired to edge dye some ribbon...another project I have put off for months. I took some of the bias cut dupioni silk ribbon and rolled it up. I tried it on white, lavender and the cameo color. I am really pleased with the results. I see the possibilities. Now I wish I had more time to DYE! Marlene Glickman who is a EXPERT dyer made this suggestion in her last newsletter.
Helpful Hints
Dyeing small bits of silk in various shades and using various techniques to imprint a design on the bits of silk requires a lot less dye for these small pieces of silk compared to a silk scarf.
Easy baggie method; add all five pieces of silk cut in 6 inch squares or smaller to a baggie. Mix 1 pipette of dye in 4 ounces of water. Pour some of this light colored dye into the baggie. Squeeze and let go until water goes clear. Remove one piece of silk. Add more drops of concentrate to your dye water and pour 1/2 ounce of dye mix into the baggie. Repeat squeezing and remove another piece of silk. Repeat for the remaining pieces of silk adding a few more drops of concentrated dye to the dye water each time to make the color darker. You can also add a touch of black to tone it down. Lay out dyed silk pieces on the table. Tabletop techniques: Place a stencil or silk leaf over one piece of silk and spray or sponge the dye onto the silk. Scrunch up another piece of silk and spray the scrunches Pull the silk into casual pleats. They will hold if the silk is wet enough. Spray the tops of the pleats. Draw on the silk using a pipette filled with dye water Fold silk in half and in half again. Clamp with a few clothespins. Pipette dye around the pins on both sides of the fabric. Remove pins. Squeeze in a baggie until water goes clear. Roll all the silk pieces in a towel and iron dry. They are now ready to use in your collage work.
Now you have no excuse to not dye your own silk cord. I have white ready to dye cord and the Colorhue Dye on my supply site TandZSupplies on Etsy Or my fabric and trims site: minidolls.com. BUT if you really don't want to even give it a try I have a bunch of already hand dyed silk cord just waiting on my TandZSupplies on Etsy: Silk Cord Section. My next plan is to over dye some silk cords.....adding some mottled colorings.
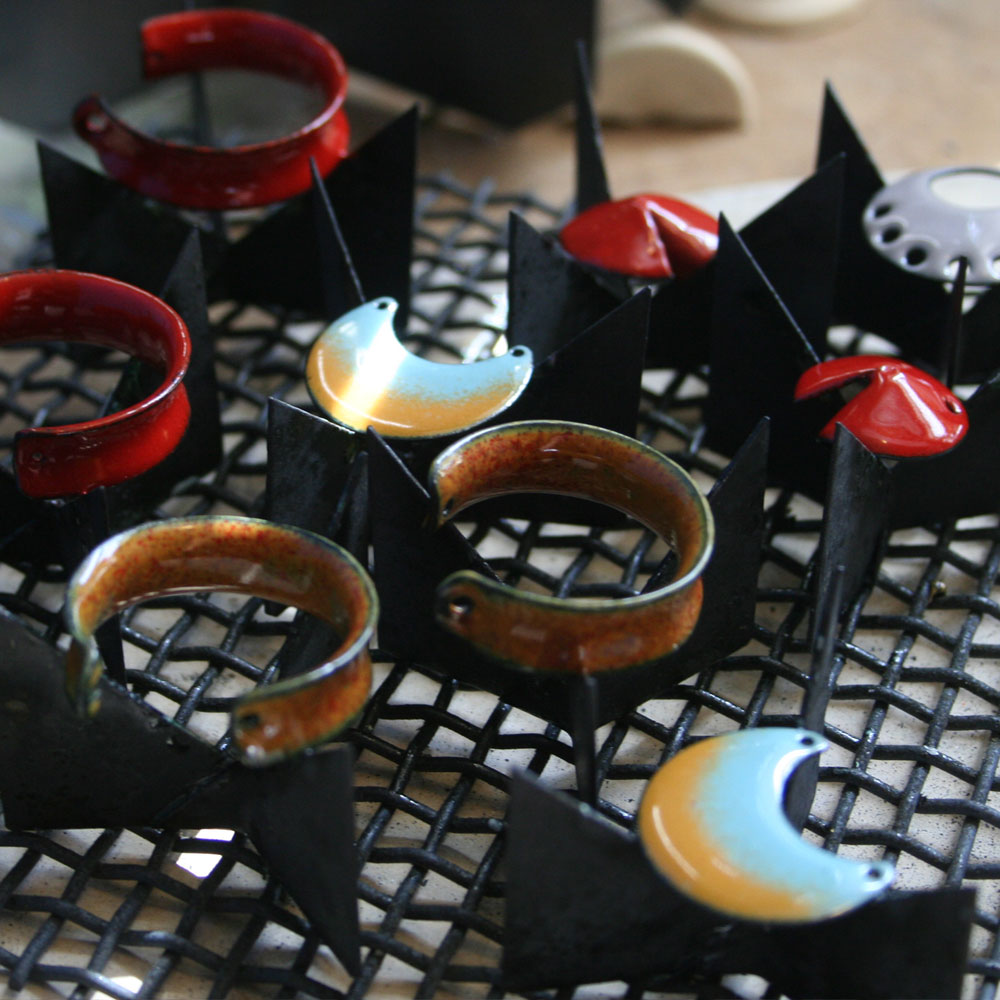
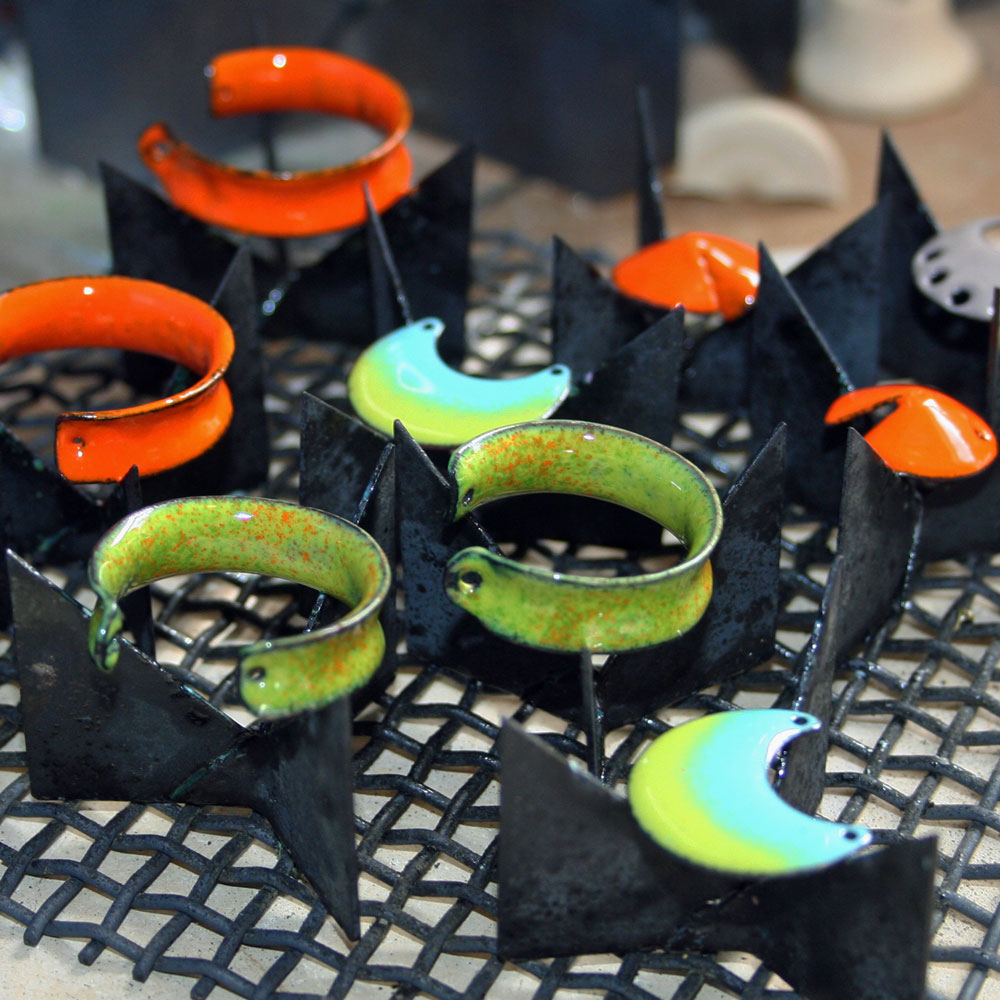
...that I am now the technical adviser for Fundaments.net. They are now carrying Thompson enamels. Jeanette Blix Ryan the owner of Fundamentals is so wonderful and sharing. I bought some of my first metal working tools from her a while back. She worked with me as I changed my mind and waffled she was patient and helped me pick the right tools and supplies that I needed. Then she became a customer of mine, so nice she purchased a pair of earrings for herself and her sister. Since we met she has become more and more intrigued with enameling. She actually took the plunge and bought a kiln. Lucky her she actually found an almost new kiln on Craigslist. Check out her blog were she has posted many of her creations: jeanetteblix.com. Here are some bangles that she made:Ok so back to being a technical adviser. It is hard to believe that I can be of any help to anyone when it comes to enameling because there is so much I feel I have to master yet. I do struggle at times. But they say about enameling it takes an hour to learn and a life time to master. So if I can help her fellow enamelist customers then I am more than pleased to. And just to give you something else pretty to look at here are a pair of earrings I made. It is my signature blend called watermelon..but with a twist. I added a touch of purple. It was actually by customer request. I really like the way it came out.Also don't forget that Jeanette and her partner Cindy Wimmer are heading a new creative retreat called ArtBLISS. Classes are filling up to don't delay. As a bonus for those reading this post and wanting to try enameling or if you already enamel Jeanette is offering a 15% discount on Thompson enamels. Just use code Mahler 15% in the comments section of your order and she will take that amount off your enamel purchase. Michelle Teka and Zoe
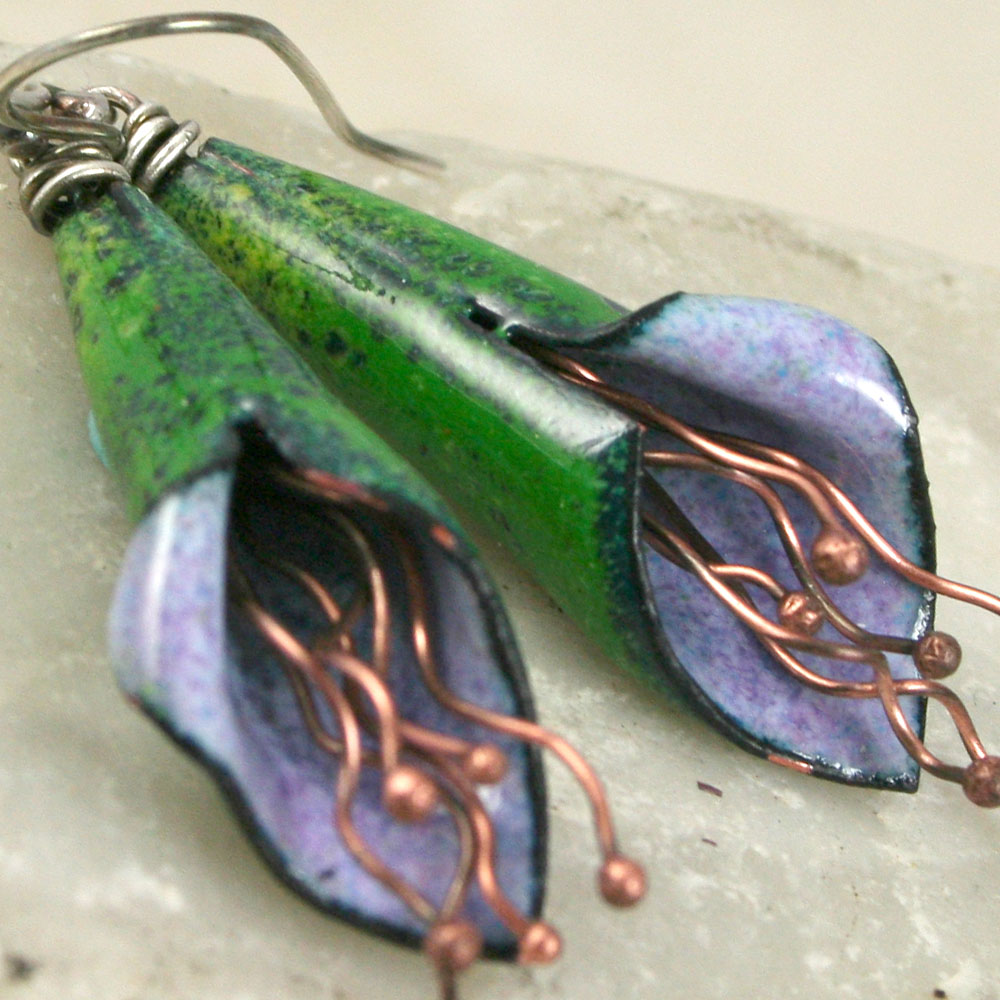
Lately I have been finding inspiration all over the place. The best inspiration comes from my customers. They ask for Colors/Styles I don't think about...or haven't gotten to yet. This ring and earrings were a suggestion from a customer, Kristin Haycocks:
So I followed the creative flow...and came up with these:
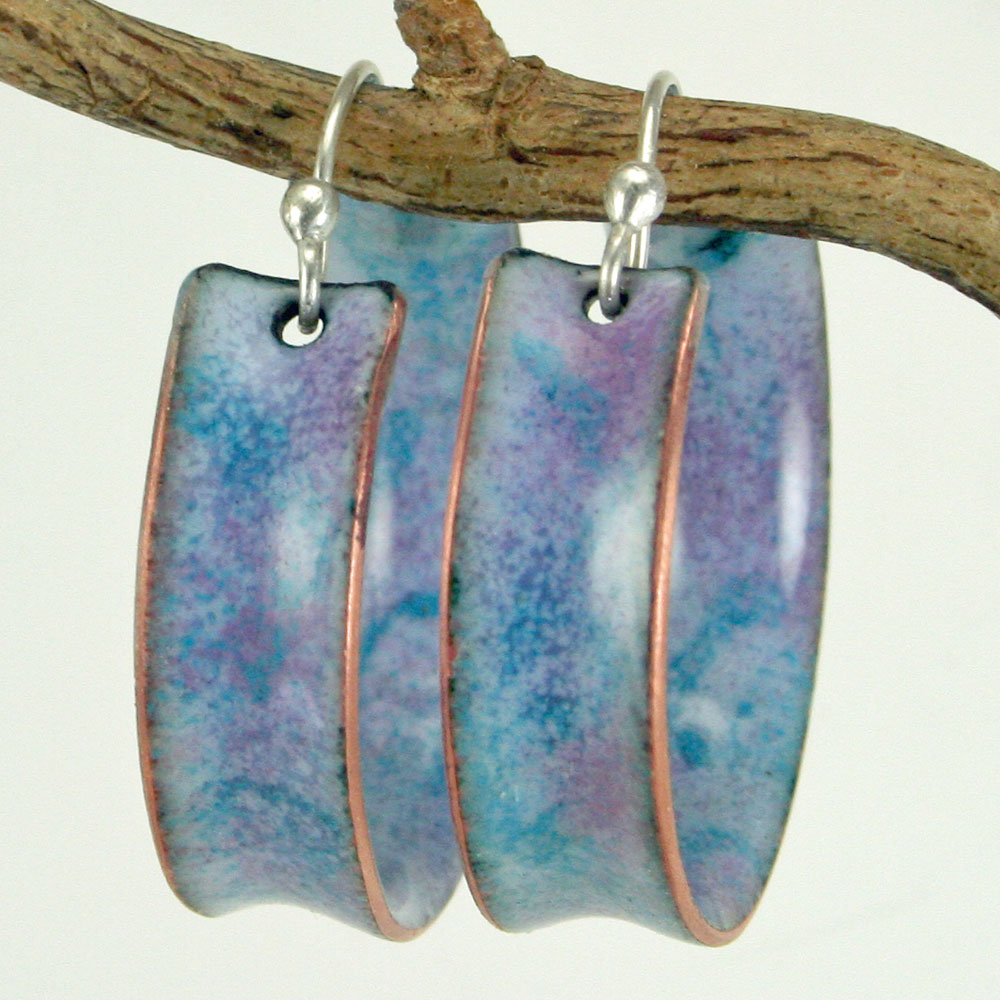
Here is another...I was in this Treasury by Kathleen Cavalaro: I just absolutely loved the pop of golden color with the robins egg blue. So I came up with this:I was so inspired by a post on Facebook by Mary Ellen Golden(who by the way does the most incredible watercolors (maryellengolden.etsy.com). She posted a picture of herself wearing a custom dyed Shirt by Diana Hughes of Dye Diana Dye(find her on etsy). Diana calls her shirt: Trailing Tendrils Time's Echo Top. Ellen had the photo taken in her Hydrangea garden wearing her top. I found it so stunning that I had to figure out how to translate this to enamel: This is what I came up with. It is my new most favorite color blend. My mind is always trying to figure out what else I can use it on...what can I shape out of copper?? Any ideas? Much thanks everyone for all of the inspiration.
My good friend Jeannette Blix Ryan(fundametals.net) with Cindy Wimmer(sweet bead studio) will be holding jewelry and mixed media retreats (and daily workshops) in the Washington, DC area. Cindy wrote up such a wonderful introduction for ArtBLISS, including the amazing instructors we have lined up for ArtBLISS’ Inaugural Event the weekend of September 24-26, 2010. You can see all the details on her blog: Announcing ArtBLISS
I stumbled on this website that has some pretty cool feature to help with your Etsy store...if you happen to have one. cr8tivity.com I like the scrolling side bar widget:
I have stepped into the exciting-ness of making bangles. I have wanted to for a LONG time. But always afraid of the whole SIZE thing. What size to make? I then just decided no more thinking just DO IT!! This is my first one and have many more to come:So to help myself and my customers I have done some research on fitting a bangle. The best and easiest way to measure for your enamel bangle is to measure a bangle that fits you and you love. You have the measure the inside diameter (distance from side to side). I have also found other info and instead or rewriting what I have learned I am just going to list what I have found and give credit. I have found the best info on Ying Yu Jade website How to measure for a jade bangle. Since they are very close in type and delicacy I thought it was a perfect match for an enameled bangle.
Here are some methods for finding your correct size bangle when you cannot try it on first. If you wear your bangle close to your wrist, it will not "clunk around" as much as a larger one will. This is important if you plan to wear it all the time. If you really like the feel of a big bangle that easily slips over your hand, then consider purchasing one that you will wear only for special occasions. Also consider wearing your bangle on your non-dominant hand. For example, if you are right handed, wear it on your left hand because you don't use that hand as often and it will receive less abuse. I didn't like my bangle clunking against my watch, so I now wear my watch on my right wrist. The easiest way to find your bangle size is to decide which wrist you will wear your bangle. Place your hand on a flat surface. Then measure between the highest points, which are the middle of of the knuckle, of your first and fourth knuckles. This is your bangle size. See illustration below. This shows the points on your knuckle you should measure between. When you measure. place your hand FLAT on a flat surface, then measure the distance between the points. Another method is using a measuring tape to measure your hand . Squeeze your hand together TIGHT. Measure the widest part of the hand The average size is about 7" - 8.0"THEN, when you think you know your size, take a piece of cardboard or a plastic lid (for example a yogurt container, or coffee can lid) and with a ruler draw a line the diameter of the bangle you think will fit. Cut a round circle and put your hand through it. This will give you a better idea how it will fit.
Video on how to put on and remove a well fitted tight bangle.
Other Tips on How to Put on a well fitted Bangle.
Apply lotion to your hand. Use as much as needed! Your hands will become more flexible over time.
Loosen up your hand by giving yourself a quick hand massage (or better yet, have someone else give you a hand massage!). Apply more lotion if needed.
Hold your hand up VERTICAL from the floor and do not stiffen your hand. The key to putting on a bangle is keeping a loose flexible hand. If you keep your arm down in a horizontal position, the bangles will be more difficult to get on (the blood flows to your hand making it swell slightly).
Think of moving your hand through the bangles rather than moving the bangles over your hand.
I think that might be everything you need to know. Please let me know if there is any confusion. Michelle Teka and Zoe
I have been working on revamping my store display for the 2 galleries I am in here locally. It is a co-op kind of thing so I can make my own display. I currently have my earrings hanging from a wire tree that I had made. (see previous post) I do no think that the tree is doing my work any favors. When you are looking at the earrings on each branch you can not see the forest for the trees. hehehe So after much back and forth and driving myself NUTSO I decided on carding my earrings. Plus I am going to have custom displays hand made out of steel to hold the cards. I have been working for around 24 hours over a 48 hour period on these stupid throw away pieces of card. That was after trying to decided for a week which way I was going to go with them...got samples of all the ready made products from RIO and made mock-up's of my "handcrafted" versions. Put a range of jewelry on each type...studied them. Asked hubbies opinion....he did not care..or said how nice. I just did not like certain features of each of the store bought cards. So I decided to make my own. The clinker was going to be the 1/2 circle little flappy thing with the hole for hoop type earrings and my crescents. Could not get a punch custom made but DID find a punch that Basic Grey makes that is a 1/2 circle notching tool. THEN I had a coupon for Micheal's...Gotta have a coupon right?! They do not have any...So I ran home and found one on Ebay. THEN....I remembered that I have a cutting plotter (it is called a craft robo http://www.graphteccorp.com/craftrobo/about.html ) that can cut out any shape on paper using vector images. I used to use it for scrapbooking before I went digital. It is pretty cool. The HARD part, getting my idea and turning it into a vector image. I have spend 2 days drawing the image so I can print out my own cards with my logo and then use the plotter to cut them. Torture at time....yes. A BIG pain in the tookus...YES. Hubby was nice and was with the kids all day today. I had to order the paper from scrapbook.com so I cannot even show you the finished version....but I will...Michelle with obsessed.
It seems impossible to think about fall colors yet....But here we are early July and the fall color fashion report is out for Fall of 2009. My local artisan gallery here in town is already talking about fall plans. It is funny I was just thinking the other day while enameling how was I going to get into the swing of the fall seasons..drab colors??? eecck! Then I saw the Pantone color report and was excited and inspired. See the full report here in pdf form: Pantone Fall 2009 Color Report. Fantastic colors...I must get enameling. Michelle Mahler Teka and Zoe and TekaandZoe.etsy.com
Craft Cult is pretty cool for tracking your Etsy Hearts and Views. Go to craftcult.com and type in your Etsy shop ID number and you will see all of your items listed and who loves them. Another cool feature is the that they keep a "Vault" of all areas were you may be featured on Etsy. I was so lucky to be on the Front Page today...For the brief moment. Of course I missed it. But you can go and pull up the Treasury used from the vault. See pics below: Here is the screen print of the actual Treasury from DesigningIt.etsy.com Thank-you Carol for making such great choices!!
Sometimes when I sit in front of that bare copper and all those packets of enamel I kind of freeze...what color palette to use? How should I mix them?? then I get en e-mail advert with the answer...Seriously yummy colors!!
I ran across this site that makes cool changes to the Etsy interface for sellers. It is for Firefox users only...I have found them useful. etsyhacks.com Popular hacks: * item zoom - adds a zoom icon to images in search and shop listings. * edit this item - edit or delete a listing from the View Listing page. * buyer info - add extra information to the "buyer" box on a receipt page. * forum wrangler - add extra features to the Etsy forum pages. cool stuff!! Michelle
I still have not made my sample chips...I do not have much time to enamel let alone make samples. Although I desperately need them. This is my endeavor in wet packing some enamel on leaves that I cut and shaped out of copper. In my mind I was not expecting it to fire the way it did. So I made numerous other firings to get them to look like the finished earrings. I had to cover the what I felt was 2 dark potion on the lower/center right. I liked they was the turned out in the end.
WET PACKED before FIRINGAFTER FIRING (several more firings)
I joined for just $7 a month...no other fees!! Click below to sign up. Plus I think their interface is easier. Example: when loading pictures while one is loading you can search for another one to load. Plus everything to add an item is on one page. No back and forth. Register on ArtFire.com
I have decided to move all my Greek Washer beads out of my Teka and Zoe Etsy store for 2 reasons: To better focus my Jewelry and to give these fantsic beads there own space. They are so fun to work with. I am in the middle of the transition so some can be found i both places. Follow the link on the right-----> GreekBeads.esty.com I will be adding new styles and colors too.

 I thought of making a video showing you how they work. But how much better could it be to see Kevin himself explaining how a blanking die (or pancake die) works with a 20-ton press. The press can do a multitude of tasks. Cutting metals blanks is just one of them. Thus the term "blanking die". This is a sample of what a pancake die looks like:
 Here is Kevin demonstrating how to cut with the die:
This is a necklace I made using this very die. I first cut it out of copper, shaped it with some reposse and dapping tools. Then I enameled it:
Here is Kevin demonstrating how to cut with the die:
This is a necklace I made using this very die. I first cut it out of copper, shaped it with some reposse and dapping tools. Then I enameled it:
 More about the press later.
Michelle Mahler Teka and Zoe and Fundametals.net
More about the press later.
Michelle Mahler Teka and Zoe and Fundametals.net